Making a new desk (part 4): Choosing and applying a finish
In part 3 of this series I ended up with a tabletop for my desk that was in its final shape, with smooth sanded surfaces, gaps filled, and nicely rounded corners. The next step was to apply a finish to the wood in order to protect it from the elements, and to enhance its aesthetic qualities including the appearance and texture.
Choosing a finishing product
Wow, there are a lot of options for how to finish wood, and a lot of strong opinions on what the best way is! I got held up for at least a month trying to understand all the different options here, and despite that I feel like I still have a very limited understanding.
One thing I learned is that there are many differences between the names that finishing products are marketed under, and the actual composition and properties of those products. Words like “lacquer” and “oil” do not have a consistent meaning, and some products have different names in different countries.
Most importantly I wanted a finish that was durable – I didn’t want to be stressed about burning it with a mug of hot coffee, scratching it with a mouse, or soaking it by spilling a drink. Ideally I also wanted to be able to use household cleaning products on it (e.g. surface cleaner) without causing any damage. This eliminated most “oils” (including products like “Danish oil” which is not just oil), because they do not entirely seal the timber and reliably keep water out. It also eliminated shellac, which is very easily dissolved.
The remaining choices were “lacquer” (which is a lot of things), polyurethane, and epoxy (epoxy has various chemical compositions but at least they all seem to work in a similar way). Epoxy is generally applied by pouring a large amount of it over a level surface so that it creates a puddle. The effect is a deep mirror finish which is extremely durable. I wanted a shallower finish which had more of the appearance of wood rather than glass. Perhaps more importantly, at this point my slab had a significant warp, and it seemed that this would complicate the process of applying a puddle of epoxy.
It seems that amongst professionals, the most preferred way of applying thin coatings is with a spray gun – a device that atomises paint into fine particles and blows it onto a surface. Using these is dangerous because paints are often extremely flammable and toxic. Probably this explains why such paints are hard to find in consumer hardware stores. Most of the higher quality coatings, and especially ones where there are clear advertised specifications, are designed to be applied with a spray gun.
I had already spent a large amount of time and money on this project and I didn’t want to compromise it with a sub par finishing product, or risk using a product that didn’t have any clear specifications (i.e. anything from hardware stores). However, I also didn’t want to spend a ridiculous sum on a spray gun that I would rarely use. The most common way to apply such finishing products is using a HVLP (high volume low pressure) spray gun. This requires a spray gun, but also a source of low pressure air from either an air compressor and pressure regulator or a turbine type motor (like a vacuum cleaner). Although most of these are expensive, I managed to find a integrated turbine and spray gun for $69 in the Chicago Air C600PS. I suspect that no professional would use this machine, but I hoped that it would be good enough for my purpose. This opened the possibility of using spray finishes.
I managed to find a number of businesses that sell wood coatings in Sydney, including Croma Coatings and BC Coatings. Each has a catalogue on their website with detailed data sheets explaining the properties of each finish. The sales rep from Croma Coatings was particularly helpful in explaining my options. The better polyurethane coatings (the 2 component or 2K ones) were not an option because they are highly toxic, to the extent that spraying them outside is illegal. Those that remained remained were lacquers.
The older type of lacquer (Nitrocellulose lacquer) was not ideal because it was less durable. It dries purely through the evaporation of solvents, so the same solvents can dissolve the paint after it dries. Also it has a tendency to turn yellow over time, especially when exposed to UV light. This was important to me because my desk was of a light coloured timber and I didn’t want it to turn yellow over time, even if it was in some sunlight.
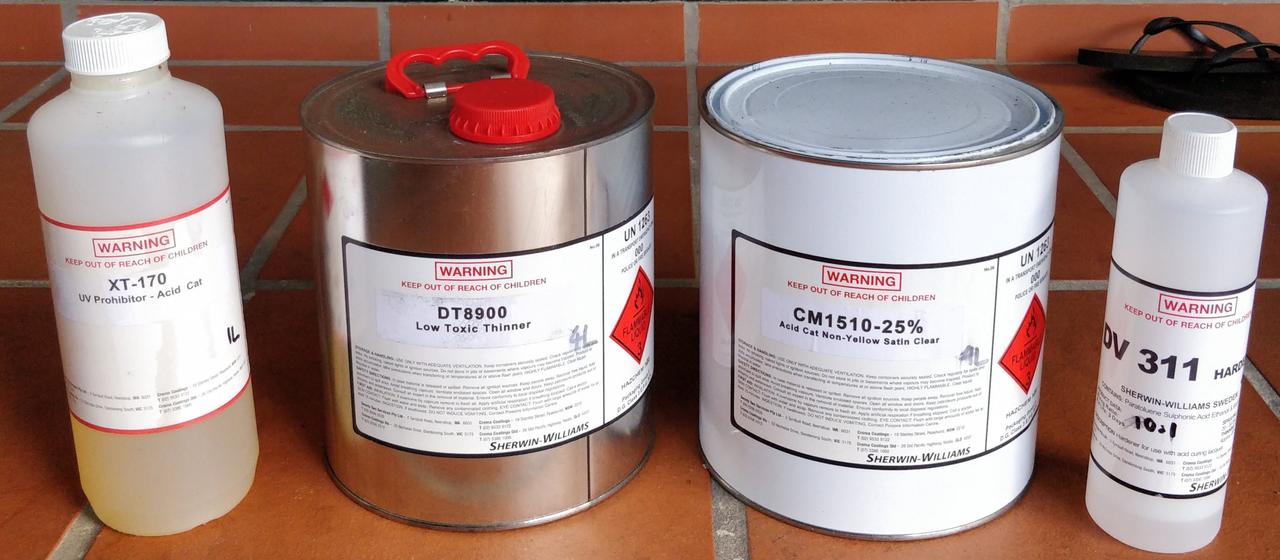
There are newer types of lacquer which chemically harden in addition to drying through the evaporation of solvents, which makes the finish more durable. These are called “catalysed lacquer”. Some have a slow catalyst which is added before sale, while others must be mixed with the catalyst immediately before use. Some of these lacquers are clear and non yellowing. My choice was the post catalysed option, which is called “acid catalysed lacquer” in Australia, and “conversion varnish” in the USA. The specific product was CM1510 clear multicoat. Being a multicoat, it can be applied both as an undercoat to seal the wood and as a topcoat to create the finished surface, so there is no need for multiple finishing products. The sales rep told me that it was almost as durable as 2K polyurethane while being safer to apply. I chose the 25% gloss option (AKA “satin”). Besides the lacquer, I bought separately the catalyst, a thinner (which is important especially for cheaper and less powerful spray guns), and a UV absorber additive (to protect the non UV resistant 2020 epoxy that I had used earlier). I considered buying also a retarder additive, which slows down the evaporation of solvents. This can be necessary to prevent “blushing” or bubbles when spraying in hot and humid weather. The sales rep told me that it wouldn’t be necessary if I picked an appropriate day to spray outdoors. The total cost for a 4 litre can of lacquer plus the additives was $242.88.
Applying the finish
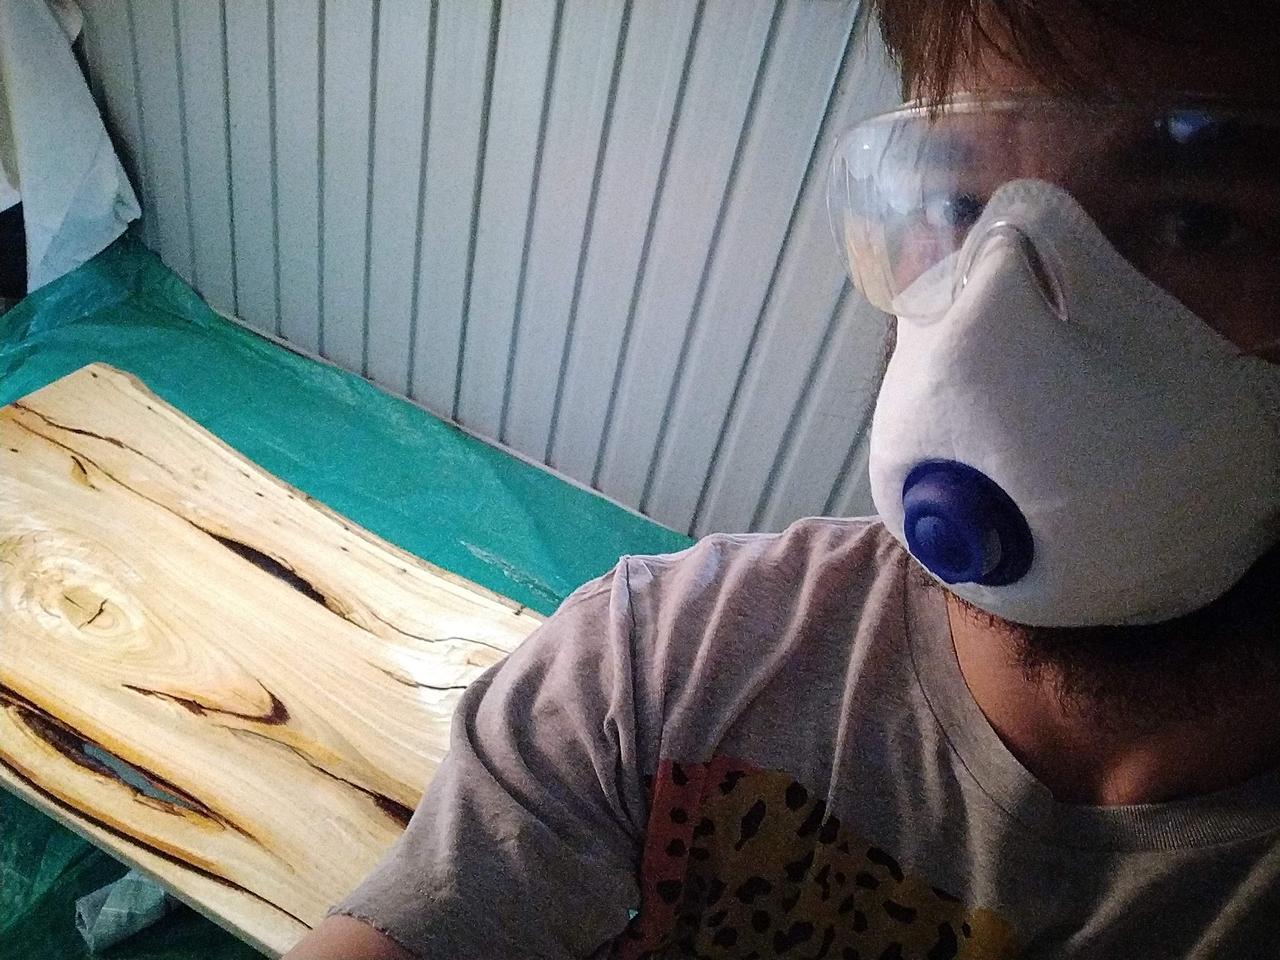
As well as the $69 paint sprayer, I bought some safety goggles and face masks to protect myself from the toxic lacquer fumes. Incredibly, a pack of disposable P2/N95 vapour masks was more expensive than the paint sprayer. Strange times.
So far I had done everything on the balcony of my apartment. Although my neighbours were very patient with loud power tools and probably some sawdust, I think spraying toxic paint fumes would have been a bridge too far (and also would have made my apartment borderline uninhabitable for a few days). My parents had an outdoor shed, which seemed like the best option. Lacquer dries to the touch in only a few minutes, but in that time its important to prevent small objects from falling onto it and creating imperfections in the finish. The shed was good because it was reasonably well ventilated but also covered and therefore sheltered from wind, dust, pollen, etc.
I experimented spraying some scrap pieces of wood to get used to the spray gun. I found that the best results were achieved with quite a large amount of thinner. The lacquer data sheet specified that it could be diluted with up to 30% thinner. I found that with any less than this, the paint gun was unable to evenly atomise it and instead threw large splotches of lacquer rather than an even mist. Unfortunately the more thinned mixture was also less able to resist dripping down vertical surfaces, which limited how much paint I could apply at once and created a dimpled surface on the vertical surfaces. Luckily my piece was almost entirely one horizontal surface, so this wasn’t a large issue, although the edges did end up with a slightly cloudy/frosty appearance. Judging by videos of automotive painting, better spray guns can atomise paint much more finely than the super cheap one I was using.
It quickly became apparent that the toxicity of lacquer fumes is not a joke. Although the thinner has the strongest smell, the lacquer fumes are truly unpleasant. In large concentrations they cause a burning sensation in the nose, and in smaller concentrations they cause a feeling resembling nausea or a headache. Even a faint smell of it (e.g. a few rooms away with windows open in the second day of drying) makes it impossible to sleep. My P2 masks and safety goggles were the bare minimum of protection. I felt a very direct physical need to hold my breath while spraying and to leave the room before inhaling again.
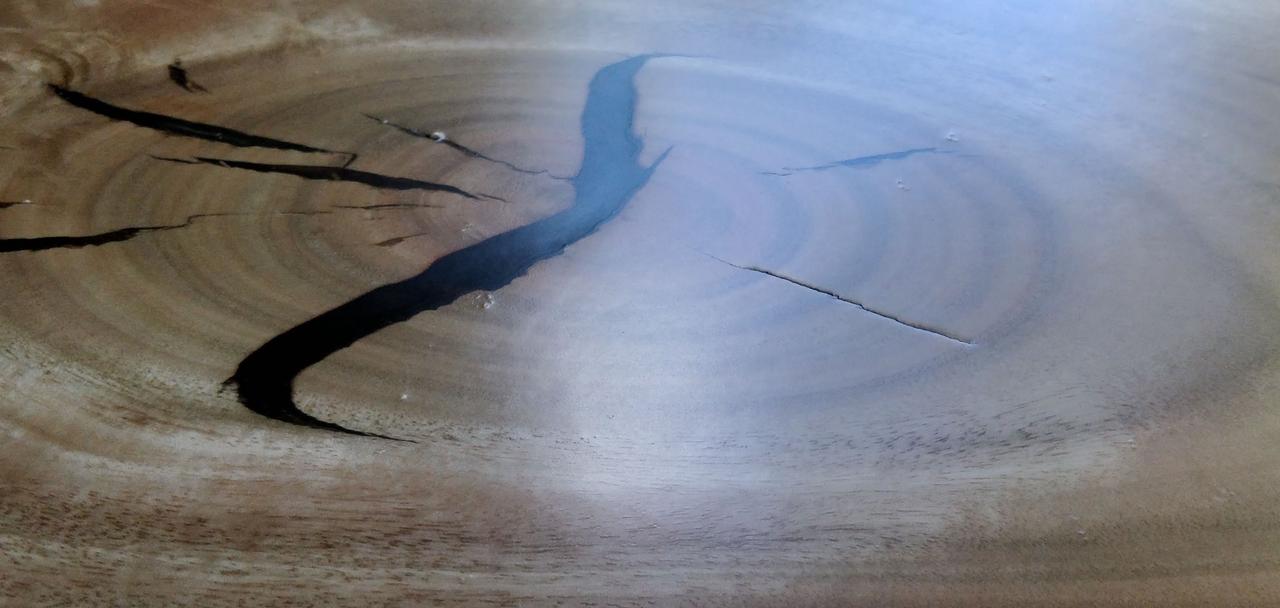
It turns out that its very difficult to prevent even a grain of dust from falling onto wet paint, even just for 15 minutes. The shed I was spraying the lacquer in had some dust on the roof, and although I did my best to shake/sweep/blow it away, some of it remained and fell on the wet lacquer. Some small hairs fell off my arms, at least one piece of pollen blew in (perhaps when I was opening/closing the shed door), and various small insects perished in the toxic lacquer fumes and fell rudely on the wet lacquer, creating imperfections.
The lacquer was also not able to fill even small cracks which were exposed by sanding after epoxying or by wood movement while I paused for weeks to read about finishes. With many coats it can fill in pores, but really nothing larger.
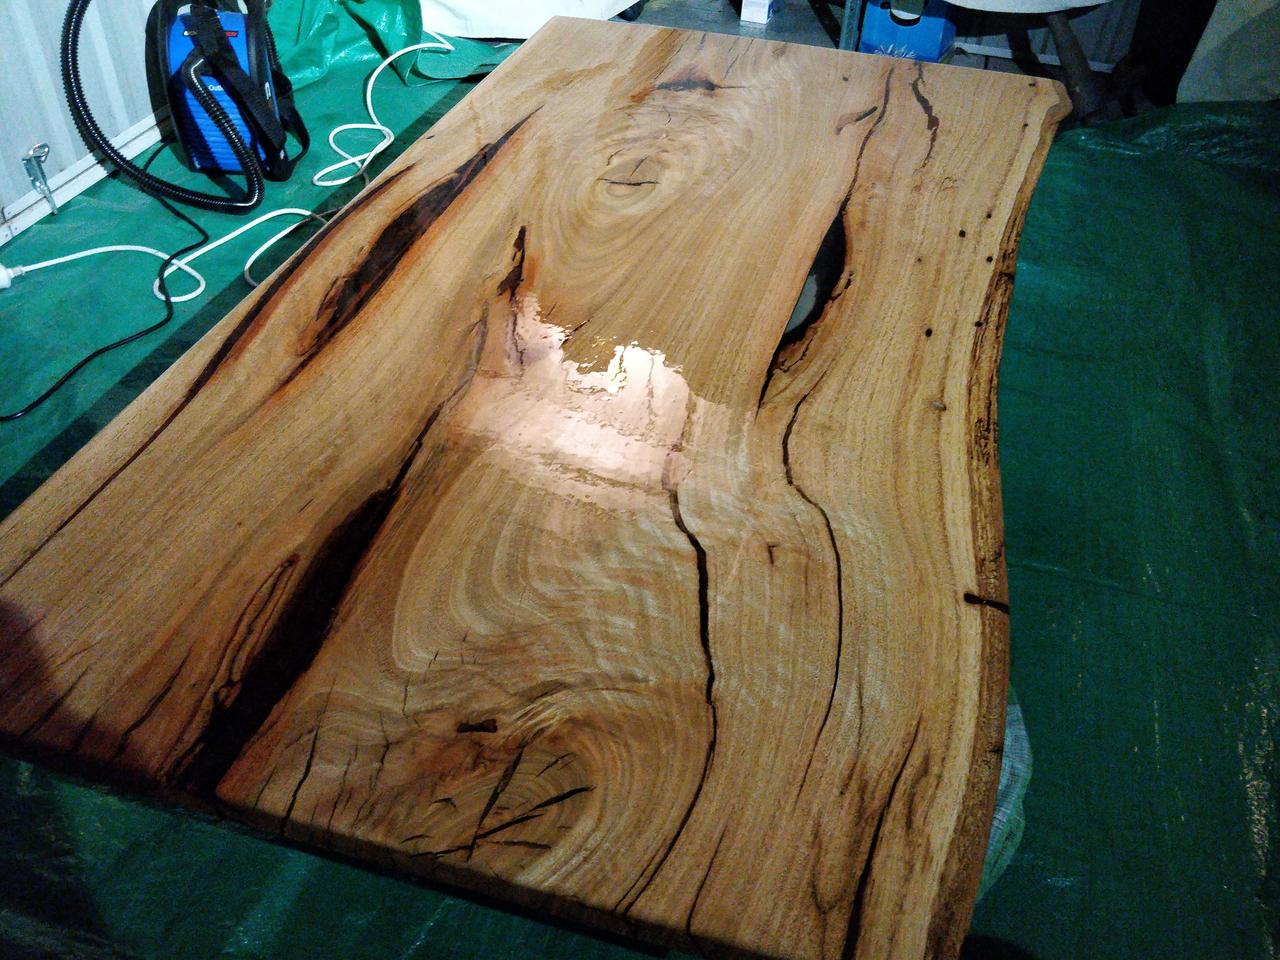
I ended up doing 3 coats on the top side, and 2 on the bottom side. The first coat raised the grain of the wood and ended up very rough. The second coat was much smoother, but was still a bit rough around the deeper pores in the wood. The third coat still didn’t fill in the pores entirely, but was very smooth to the touch. Before each coat I sprayed some lacquer on scrap wood to adjust the spray gun volume and check the conditions. Spraying on a wet piece of wood exaggerated the blushing effect which can happen when it is too hot or humid, and was a good test for the conditions. I got a noticeably smoother finish during the colder times of the day, in the context of some fairly typical Sydney days with 25C maximum temperature, relatively high humidity, and occasional showers.
After the first coat I sanded the surface using a random orbital sander with 320 grit discs, and the edges by hand. The second coat was smoother and I sanded it by hand with 400 grit sandpaper. Since this lacquer cannot dissolve previous coats, sanding is necessary to make subsequent coats stick. After sanding, I removed the sawdust by using the spray gun as a blower and wiping over the cracks with a dry microfibre cloth. It’s necessary to wait about 2 hours between spraying and sanding. Over one weekend of 3 nights and 2 days I was able to do all 5 applications, including all the preparation and cleanup.
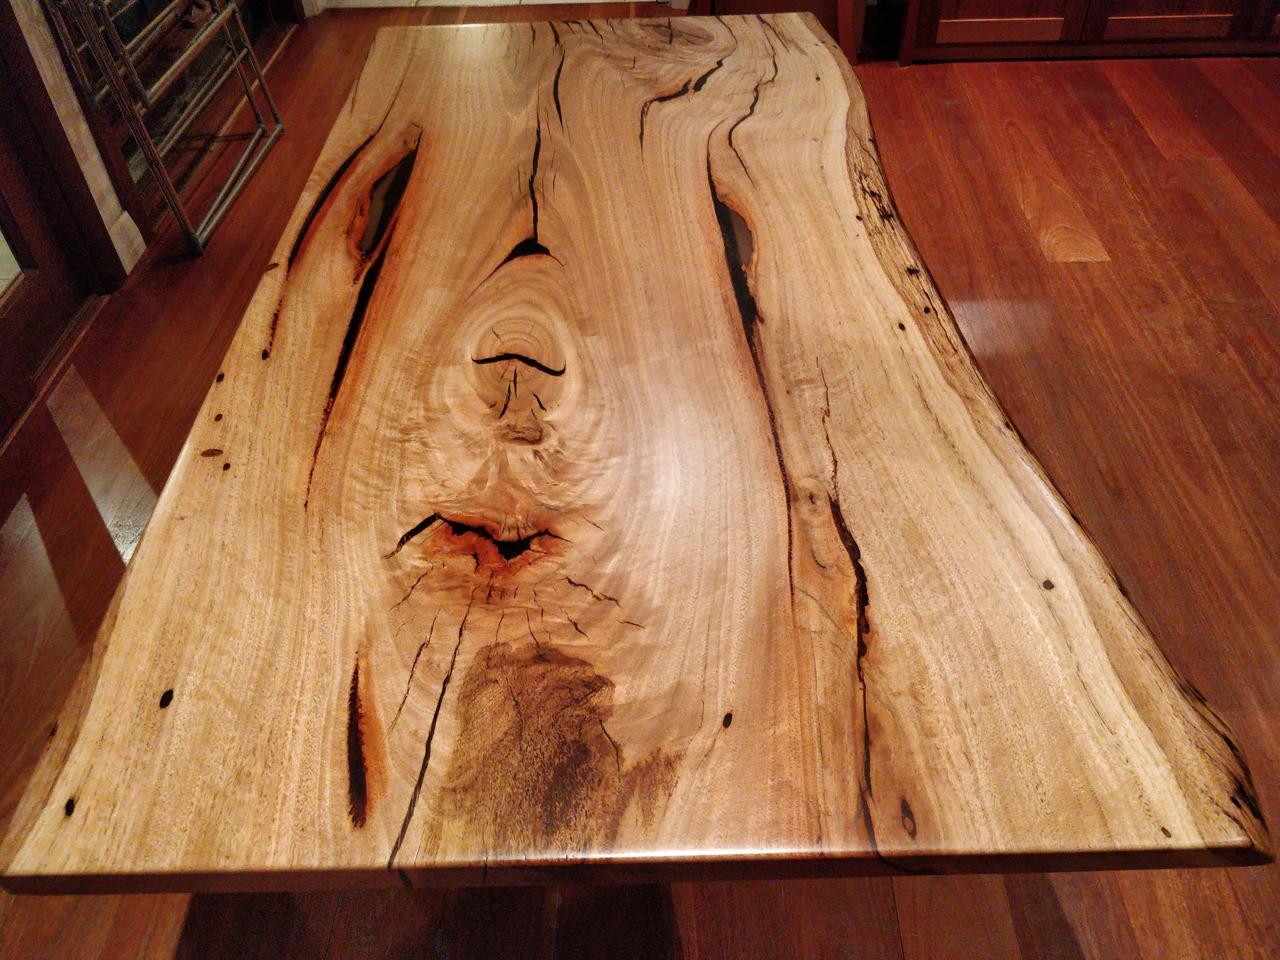
I thought it looked pretty awesome at this point, and I felt really satisfied because I had finished all the tasks which I wasn’t familiar with. The finish looks and feels great in my opinion. It’s really smooth visually and to the touch, preserves the natural colour of the wood, and as far as I can tell is very durable. It even has a strong tendency to resist dust, much more so than my old desk, which I suspect was finished with nitrocellulose lacquer. It took a few days to stop smelling like poison, and a week to fully harden and resist scratches.
Next step: final assembly
The finishing of the tabletop was now complete, so the next and final step was to assemble the desk. For this, as well as my overall reflections on the project, check out part 5.